Thank you, Mary Stori, for encouraging me to change my teaching format to digital. So far all of my quilt guild program presentations have been made using a flip chart. If you're too young to know what that is, don't tell me please.
Anyhoo, I've been collecting the necessary equipment for digital presentations over the last few months and I'm nearly ready to give my first digital presentation in Power Point on Tuesday to the Lake Oconee Quilters, Eatonton, GA.
I found a wonderful little device called a micro projector at Radio Shack in December. This baby is 3-1/2" x 3" x 1-1/2", and it puts out a fine picture. The box says the projection will be 50" x 50", but it looks good larger too. Best of all, it was under $100! There was no way I could afford an $800 projector right now, so I'm pleased.
Sunday, January 31, 2010
Monday, January 25, 2010
Taking Stock
Sunday, January 24, 2010
Red String Quilt
This week I've been very busy closing out my 2009 books, dyeing fabric for the Pensacola Quilt Show vendor booth in February, preparing for a program and class I'm giving next week to the Lake Oconee Quilters, and much more.
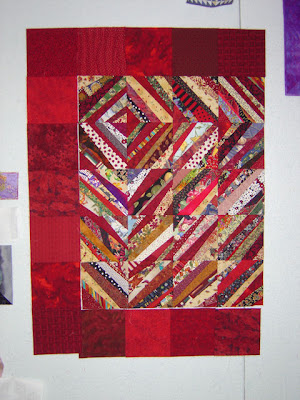
One of my projects has been to take apart and then add more blocks to a red string quilt sample for the class at Lake Oconee. Here's the original sample...
which was a little boring and too small. Here it is again after making more blocks and changing the layout...
Much better, and it's now a nice nap-size quilt.
Tuesday, January 19, 2010
Machine Quilting Today
Today I have been working on some machine quilting. Mind you, I have been practicing machine quilting for a while, but for 6 months this year when I was on crutches the mid-arm machine sat unused.
Having said that, it has been a slow re-start for my machine quilting. The new "stitch regulator" (see yesterday's post) is working wonderfully well. I can put full pressure on the foot pedal of the machine and only have to worry about the speed of my hands as I machine quilt. From there the correct hand speed for nice, even stitches is easy to figure out...doesn't mean I sew the perfect stitch continually, but it's getting better. Here's what I'm working on this week...
...string-pieced attic windows. Unfortunately I used sateen fabric for the window pane and every time I have to take stitches out the old stitch holes remain (see the top center window below). Frustrating...this is the last time I will use sateen in a quilt.
I've made another discovery about machine quilting this week: I don't like to have to pull the bottom thread to the top of the work each time before sewing. To make it easier, I lift the quilt and find the lower thread. By holding both the top and bottom threads while making the first two stitches, I can commence quilting without creating a thread a nest under the quilt or breaking the thread. So much easier that stopping to bring the bottom thread to the surface each time I work on a window pane. Later, the threads are knotted and buried in the batting.
Friday, January 15, 2010
Homemade Stitch Regulator (Updated)
Necessity is definitely the mother of invention.
Today I invented a $3 stitch regulator which will keep my sewing machine control pedal from sewing at the highest speed. I have a high speed machine and it's hard to keep the speed just where I need it when I'm machine quilting. If you have the same problem while machine quilting and using a sewing machine with a foot controller pedal, this solution may work for you too. Here's how I made it:
***Please follow all safety precautions and use common sense if your foot pedal is different than mine.
Supply List:
I used my ruler and rotary blade to straighten one of the edges of the felt.
Then I turned it around and measured 3/8" and cut a long rectangular piece from the felt.
The photo below is my foot controller pedal...
Here it is with the self-stick felt pad on it, positioned in just the right place to keep my pedal from sewing out-of-control fast. This level on my pedal is just right for an even stitch with a somewhat swift movement of the fabric...therefore, I can put full pressure on the pedal and keep it at a perfect constant speed!
The heavy duty felt will give a little, so you may need to cut several slices in 1/8" increments from the felt before you find the size that works best for you.
What do you think? If you try this, let me know how it works for you, and send along any tips you find that help it to work better.
The "necessity" for this stitch regulator was simple...I have short legs, but the chair must be high enough to see my work and move the quilt sandwich easily, while at the same time my foot must reach the pedal comfortably. I often have to adjust myself as I machine quilt, which puts too much pressure on the pedal and runs the stitching out of control for a few inches of teeny tiny stitches. This "regulator" will keep that from happening while allowing me to put full and constant pressure.
Today I invented a $3 stitch regulator which will keep my sewing machine control pedal from sewing at the highest speed. I have a high speed machine and it's hard to keep the speed just where I need it when I'm machine quilting. If you have the same problem while machine quilting and using a sewing machine with a foot controller pedal, this solution may work for you too. Here's how I made it:
***Please follow all safety precautions and use common sense if your foot pedal is different than mine.
Supply List:
- Heavy duty felt pad, as large as you need (available at home improvement stores or Walmart for about $3.00). They are usually used under furniture to protect floors.
- rotary cutter with an old blade or a blade used for paper, not your good fabric blades
- square ruler
- cutting mat
I used my ruler and rotary blade to straighten one of the edges of the felt.
Then I turned it around and measured 3/8" and cut a long rectangular piece from the felt.
The photo below is my foot controller pedal...
Here it is with the self-stick felt pad on it, positioned in just the right place to keep my pedal from sewing out-of-control fast. This level on my pedal is just right for an even stitch with a somewhat swift movement of the fabric...therefore, I can put full pressure on the pedal and keep it at a perfect constant speed!
The heavy duty felt will give a little, so you may need to cut several slices in 1/8" increments from the felt before you find the size that works best for you.
What do you think? If you try this, let me know how it works for you, and send along any tips you find that help it to work better.
The "necessity" for this stitch regulator was simple...I have short legs, but the chair must be high enough to see my work and move the quilt sandwich easily, while at the same time my foot must reach the pedal comfortably. I often have to adjust myself as I machine quilt, which puts too much pressure on the pedal and runs the stitching out of control for a few inches of teeny tiny stitches. This "regulator" will keep that from happening while allowing me to put full and constant pressure.
Thursday, January 14, 2010
Early Bird Quilters
Monday, January 11, 2010
Weekend Fabrics
Here are some of the fruits of my fabric dyeing labors this weekend. I actually dyed about 28 yards on Saturday and rinsed them yesterday, but these are the dye parfait pieces...
And I dyed two of these next pieces. This is only half the piece; the left side opens out and becomes a darker and darker red.
All of these pieces are on their way to my display at the Helix gift store in downtown Athens, GA.
And I dyed two of these next pieces. This is only half the piece; the left side opens out and becomes a darker and darker red.
All of these pieces are on their way to my display at the Helix gift store in downtown Athens, GA.
Friday, January 8, 2010
Dye Parfait
Yesterday I made some dye parfaits with 3 yards of fabric and 3 dye colors each in the manner of Ann Johnston's Color by Accident book.
And yesterday and today I pieced together AJ's string quilt. This morning I put on the borders and sent the quilt off to be basted together by Amanda on her long arm machine. When I get it back I'll start quilting it!
The sun blazes into the studio on sunny mornings, so this photo is not perfect.
And yesterday and today I pieced together AJ's string quilt. This morning I put on the borders and sent the quilt off to be basted together by Amanda on her long arm machine. When I get it back I'll start quilting it!
The sun blazes into the studio on sunny mornings, so this photo is not perfect.
Wednesday, January 6, 2010
Sewing & Dyeing
I've been sewing together the blocks for AJ's quilt and will finish the center tonight and then add borders...
Wouldn't you know it? Look at that bad little block facing the wrong way! Center square, top right corner. Ugh. Okay, I'll fix it. BAD block!
I chose the bottom right border sample as the outside border and the inside border will be a rich, dark black.
I found that border fabric in Florida at the Rainbow's End quilt shop. It was a burnt orange batik but it was a little too light, so I over-dyed it with black dye to make it darker. Now it's perfect!
Speaking of dye, I just mixed up a bunch of fabric dye concentrates including some yummy colors from my friend Nancy. Violet and Strongest Orange will be beautiful together.
There are just too many fun things to do! I woke up at 4:30am with a head full of wanna-do's.
Friday, January 1, 2010
2009 in Review
On the start of this new year, here's a review of the past year. Have I accomplished much creatively? Let's see...
I taught quite a bit this year, so making class samples was a high priority:
Because we had 3 vendor booths this year, there was quite a lot of fabric dyeing and pincushion making going on...
There was also a little time to do some beading...
And, my goodness, these look like the only quilt blocks I made this year for a large quilt as a gift...
Just imagine how much more I could have done without having to use crutches for 6 months this year! All things considered, it was quite a wonderfully creative year. Also this year I realized how much I truly enjoy teaching.
Another advancement in 2009: my husband has started to create his own fine projects in wood and with rust dye.
All the best to you in this coming year. On to 2010!
Subscribe to:
Posts (Atom)